
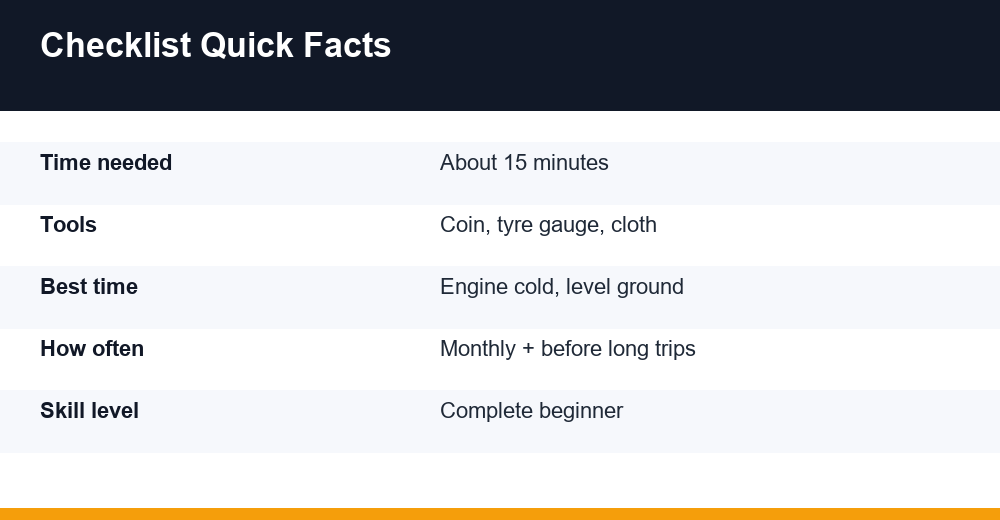
A monthly car maintenance checklist takes about fifteen minutes, needs no spanners, and gives you a far better chance of spotting trouble before it leaves you stranded. This guide walks you through ten simple checks, explains what “normal” looks like for each one, and tells you honestly when a problem is a job for a qualified mechanic rather than for you.
Table of Contents
Before You Start: Safety, Timing and Kit
You do not need to know how an engine works to do these checks. You only need to know where to look and what a healthy reading looks like. Everything is done with the car parked and the engine off, and nothing involves lifting the car or crawling underneath it.
Pick a regular slot, such as the first Saturday morning of each month, and do the checks with the engine cold. A cold engine gives accurate fluid readings, cold tyres give accurate pressure readings, and nothing under the bonnet will burn you.
What you need
- A tyre pressure gauge (an inexpensive pen or digital type is fine), or the gauge on a fuel-station air machine
- A coin for a quick tread check, or a cheap tread depth gauge
- A clean, lint-free cloth or paper towel for the dipstick
- Your owner’s manual, printed or digital
Ground rules
- Park on level ground with the handbrake (parking brake) on and the engine switched off.
- Never open the radiator or coolant cap on a warm engine. The system is under pressure and can spray scalding fluid.
- Keep loose clothing, long hair and jewellery clear of the engine bay. On some cars the electric cooling fan can start by itself even with the engine off.
- On hybrids and electric vehicles, never touch the orange high-voltage cables or anything with a high-voltage warning label.
Your owner’s manual always wins: where this guide gives typical figures, follow the numbers printed for your car instead.
Your Monthly Car Maintenance Checklist at a Glance
Here is the whole monthly car maintenance checklist on one screen. Most people finish in 15 minutes after two or three goes; the first attempt takes longer while you find where everything lives under the bonnet (the hood, in North America).
| # | Check | Time | Normal | Get help if |
|---|---|---|---|---|
| 1 | Ground under the car | 1 min | Dry, or clear A/C water | Coloured or oily puddles |
| 2 | Tyre pressure (and spare) | 4 min | Matches door-jamb figure when cold | One tyre keeps losing air |
| 3 | Tread and sidewalls | 2 min | Even wear, above the wear bars | Bulges, cuts, uneven wear |
| 4 | Engine oil | 2 min | Between MIN and MAX | Milky, gritty or dropping fast |
| 5 | Coolant | 1 min | Between MIN and MAX | Keeps dropping; oily film |
| 6 | Brake fluid | 1 min | Between MIN and MAX | Below MIN or sudden drop |
| 7 | Screenwash | 1 min | Reservoir reasonably full | Leaks or no spray |
| 8 | Wipers and windscreen | 1 min | One clean sweep, no chips | Smears, judder, cracks |
| 9 | Lights and warning lamps | 2 min | All work; dash lamps go out | Red light stays on |
| 10 | Battery terminals | 1 min | Clean, tight, no crust | Deposits, swollen case |
Think of this routine as an early-warning system, not a service. It sits alongside the bigger jobs your manufacturer specifies, such as oil changes and brake inspections. For those, see our car maintenance schedule by mileage, which explains what usually happens at each interval.
Jot down your tyre pressures, oil level and anything odd in a notebook or phone note. Over a few months you will spot slow trends, such as one tyre that always needs air, before they turn into a breakdown.
Checks 1–3: Leaks, Tyre Pressure and Tread
1. Look under the car for leaks
First, glance at the ground where the car was parked overnight. A few drops of clear water near the front passenger footwell are usually air-conditioning condensation, which is normal, especially in hot, humid weather. Anything else deserves a second look.
| Colour of drip | Likely source | What to do |
|---|---|---|
| Clear, odourless water | Air-conditioning condensation | Nothing; this is normal |
| Light brown to black, slippery | Engine oil | Check the oil level; book a check if the drip continues |
| Green, orange, pink or blue, sweet smell | Coolant (toxic to pets and children) | Check coolant; book a check soon |
| Red or reddish-brown | Automatic transmission or power steering fluid | Book a mechanic |
| Clear to yellowish, oily, near a wheel | Possibly brake fluid | Do not drive; call a mechanic |
2. Check tyre pressure, including the spare
Under-inflated tyres (tires, in American English) wear faster, use more fuel and grip less in the wet. The US road-safety regulator, the National Highway Traffic Safety Administration, advises checking every tyre, including the spare, at least once a month while the tyres are cold, meaning the car has not been driven for about three hours.
- Find your car’s recommended pressures on the label inside the driver’s door frame, inside the fuel flap or in the manual. There may be separate figures for front, rear and a fully loaded car.
- Ignore the number moulded into the tyre sidewall. That is the tyre’s maximum pressure, not the right one for your car.
- Remove the valve cap, press the gauge firmly onto the valve and read the figure.
- Add air if it is low, or press the valve’s centre pin briefly to release some if it is high, then recheck and refit the cap.
For reference, many ordinary passenger cars sit somewhere around 30–36 PSI (roughly 2.1–2.5 bar), but this is only a typical range and some cars differ considerably. One bar is about 14.5 PSI. Our guide to finding the correct tyre pressure covers loads, units and seasonal adjustments in more detail.
Pressure drops as the air cools: a common rule of thumb is about 1 PSI (roughly 0.07 bar) for every 10°F (about 5.5°C) fall in temperature. That is why so many tyre warning lights come on during the first cold morning of autumn.
3. Inspect tread depth and sidewalls
Tyres have small raised tread wear indicator bars moulded into the bottom of the main grooves. When the tread wears down level with those bars, the tyre is at or near the legal limit and should be replaced.
Legal minimums differ by country. In the UK and EU it is 1.6 mm across the central three-quarters of the tread; most US states use 2/32 inch (about 1.6 mm); Australia uses 1.5 mm. Many safety experts suggest replacing tyres at around 3 mm (roughly 4/32 inch), because wet-road grip falls away sharply as tread wears.
A coin gives a rough answer in seconds, and our step-by-step guide on how to check tyre tread depth explains the coin tests and gauges properly. While you are crouched there, look around each sidewall:
- Bulges or blisters: the tyre’s internal structure is damaged, so do not drive on it; fit the spare or have it replaced first.
- Cuts, cracks or embedded objects such as screws: leave anything stuck in the tread where it is and have a tyre specialist assess it.
- Wear on one edge only: often a sign of alignment or suspension trouble that a mechanic should check.
Checks 4–7: The Four Fluids Under the Bonnet
Open the bonnet with the release lever inside the car, then the safety catch at the front. Most fluid caps are colour-coded or marked with a symbol; the manual shows which is which.
4. Engine oil
With the car level and the engine cold (or switched off for at least 5–10 minutes), pull out the dipstick, which usually has a yellow or orange handle. Wipe it clean, push it fully back in, then pull it out again and read where the oil film ends.
- Normal: the level sits between the MIN and MAX marks. Fresh oil is amber and darkens to brown or black over time, which is expected.
- Top up: if it is near MIN, add a little of the oil grade listed in your manual, wait a minute and recheck. The gap between the marks is often about one litre (roughly a US quart), so add small amounts and do not overfill.
- Call a mechanic: milky or frothy oil, a gritty feel, a burning smell, or a level that drops noticeably every month.
Some newer cars have no dipstick and show the oil level on the dashboard screen instead; the manual explains how to read it.
5. Coolant
Coolant (often called antifreeze) lives in a translucent plastic expansion tank with MIN and MAX lines on its side. You can almost always read the level without opening anything, which is the safest way. It should sit between the lines when the engine is cold.
Coolant comes in several colours, and different types should not be mixed, so top up only with the type named in your manual. If it looks rusty brown, has an oily film, or needs topping up again within a few weeks, have the cooling system checked. Overheating can wreck an engine quickly.
6. Brake fluid
The brake fluid reservoir is usually a small tank near the driver’s side of the bulkhead, with a cap marked with a circular brake symbol. Read the level through the side of the tank; there is no need to open it.
The level falls very slowly as brake pads wear, so a gradual drop over many months is normal. A sudden fall, a level below MIN, or a soft or spongy pedal suggests a leak. Brakes are not a DIY job: have a mechanic look before you drive further. Very dark fluid is usually due for the replacement your schedule specifies.
7. Screenwash
The washer reservoir normally has a blue cap with a windscreen symbol. Fill it with a proper screenwash mix rather than washing-up liquid, which can smear and leave residue. Where temperatures drop below freezing (32°F / 0°C), use a winter-rated mix so the jets and pipes do not freeze.
Checks 8–10: Wipers, Lights and Battery
8. Wipers and windscreen
Spray the screen and watch one or two sweeps. A healthy blade clears the glass in one quiet pass. Streaks, juddering or unwiped patches mean the rubber has hardened or split; lift each blade and feel the edge for nicks.
Blades typically last six to twelve months, often less in strong sun and heat. Check the windscreen for chips, too, as small ones can often be repaired cheaply before they spread. In the UK, for example, damage larger than 10 mm in the strip directly in front of the driver, or larger than 40 mm elsewhere in the wiper-swept area, can fail the MOT test.
9. Lights and dashboard warning lamps
Switch on the ignition and test each light in turn. Parking facing a wall, garage door or shop window lets you see the reflection, or ask a friend to stand outside for a minute.
- Dipped (low) and main (high) beam headlights
- Sidelights or daytime running lights
- Front, rear and side indicators, then the hazard lights
- Brake lights, including the high-level centre light
- Reversing lights, rear fog light and number plate lights
When you start the car, the dashboard lamps should light briefly as a self-test and then go out. Broadly, an amber light means “get this checked soon”, while a red warning light means stop safely and investigate. Working lights are a legal requirement almost everywhere.
10. Battery terminals
Locate the 12-volt battery (on some cars it sits in the boot or under a seat, so check the manual). Without touching anything, look at the two terminals where the cables clamp on.
- Normal: clean metal, cables firmly attached, the case flat and undamaged.
- Worth attention: white, grey or blue-green crusty deposits, which are corrosion. These can contain acid, so do not brush them off with bare hands; a mechanic can clean and protect the terminals in minutes.
- Book a check: a swollen or cracked case, a rotten-egg smell, slow cranking on cold mornings, or a battery warning light.
Batteries commonly last around three to five years, often less in very hot climates, so a quick battery test before winter or a long trip is worthwhile.
Adjusting the Routine for Your Climate and Car
The same ten checks apply everywhere, but the weak points shift with the weather. Adapt your monthly car maintenance checklist to where and how you drive.
- Hot climates (regularly above 95°F / 35°C): heat shortens battery life and bakes wiper rubber. Watch coolant closely and check tyre pressures early in the morning before the sun warms them.
- Cold climates (often below 32°F / 0°C): tyre pressures drop, batteries struggle, and screenwash needs antifreeze. Clear snow off every light before setting off.
- Monsoon and heavy-rain regions: tread depth and wiper condition matter most. Never drive through deep floodwater, and if the engine has been flooded, do not try to restart it; call a mechanic.
Hybrids and electric cars
An electric car has no engine oil to check, but tyres, wipers, lights, screenwash, brake fluid and usually a coolant tank for the battery and motor still need a look. EVs are heavy, so tyres can wear faster than you might expect, and they still have a small 12-volt battery that can go flat. Leave anything high-voltage strictly to trained technicians.
When to Stop and Call a Mechanic
The point of a monthly car maintenance checklist is to notice problems, not to fix them all yourself. Adding air or screenwash is fine for anyone; the items below are not.
| What you notice | Why it matters | How urgent |
|---|---|---|
| Brake fluid below MIN or a spongy pedal | Possible leak in the braking system | Do not drive; call a mechanic |
| Red oil or temperature warning light | Risk of serious engine damage | Stop safely and switch off |
| Bulge or cut in a tyre sidewall | Tyre could fail suddenly | Fit the spare or call for help |
| Milky oil or coolant disappearing | Possible head gasket or cooling fault | Book within days; avoid long trips |
| Fuel smell inside or around the car | Fire risk | Do not drive; get it inspected |
| Airbag or steering warning light | Safety systems may not work | Book promptly |
| Uneven tyre wear or pulling to one side | Alignment, suspension or brake issue | Book within a week or two |
When you book, describe what you saw, when it started and whether it is getting worse. Your monthly notes are genuinely useful here.
Finally, treat the monthly car maintenance checklist as one layer of care. Pair it with the services in your owner’s manual, and for a clear picture of what typically falls due at, say, 6,000 miles (about 10,000 km) or 12,000 miles (about 19,000 km), keep our mileage-based maintenance schedule bookmarked. Fifteen unhurried minutes a month will tell you a great deal about the health of your car.
Frequently Asked Questions
How long does a monthly car check take?
About 15 minutes once you know where everything is. The first time may take 30 minutes while you locate the dipstick, reservoirs and pressure label. Doing the checks in the same order each month quickly makes them routine.
Should I check my oil with the engine hot or cold?
Cold, or at least 5–10 minutes after switching off, with the car on level ground. That lets oil drain back into the sump so the dipstick reads accurately. Some cars specify a warm check, so follow your owner’s manual if it says otherwise.
Can I use plain water instead of screenwash?
In a pinch, yes, in warm weather. Proper screenwash cleans grime and insects far better and resists bacterial growth in the tank. In freezing weather plain water can freeze in the jets and pipes, so use a winter-rated mix.
Does an electric car need monthly checks?
Yes. EVs skip the engine oil check, but tyres, brake fluid, screenwash, wipers, lights and the 12-volt battery still need attention. EVs are heavier, so tyre pressure and tread deserve extra care. Never touch high-voltage components or orange cables yourself.